03. Masking System
Purpose
When an outfit is equipped on a character:
- It should naturally hide the character's body mesh, and
- Enable proper layer combinations without visual conflicts.
To achieve this, you must correctly understand and apply
Drawing Regions, Covering Regions, and Body Regions.
Why the Masking System Is Needed
- A single outfit works fine by itself,
- But when combined with other outfits, or
- Overlaps the body mesh,
→ Visual issues like mesh clipping or intersection may occur.
To prevent this:
- Define which areas of your outfit should be masked (Drawing Regions)
- Specify which lower-layer outfit parts should be hidden (Covering Regions)
- Hide specific parts of the character’s body (Body Regions)
Masking System Overview
| System Type | Description | How to Apply |
|---|---|---|
| Drawing Regions | Areas of the outfit to be masked | Place UVs in designated regions on UV Channel 2 |
| Covering Regions | Parts of lower-layer outfits to hide | Assign Covering Region IDs |
| Body Regions | Body parts to hide when equipped | Assign Body Region IDs |
1. Drawing Regions
- Description
- Set mask regions using UV Channel 2.
- Place UV shells into the designated region areas.
- UV Channel 2 Workflow
- Create UV Channel 2
- Move UV shells to the correct Region ID areas
- Use guides to avoid overlap between different regions
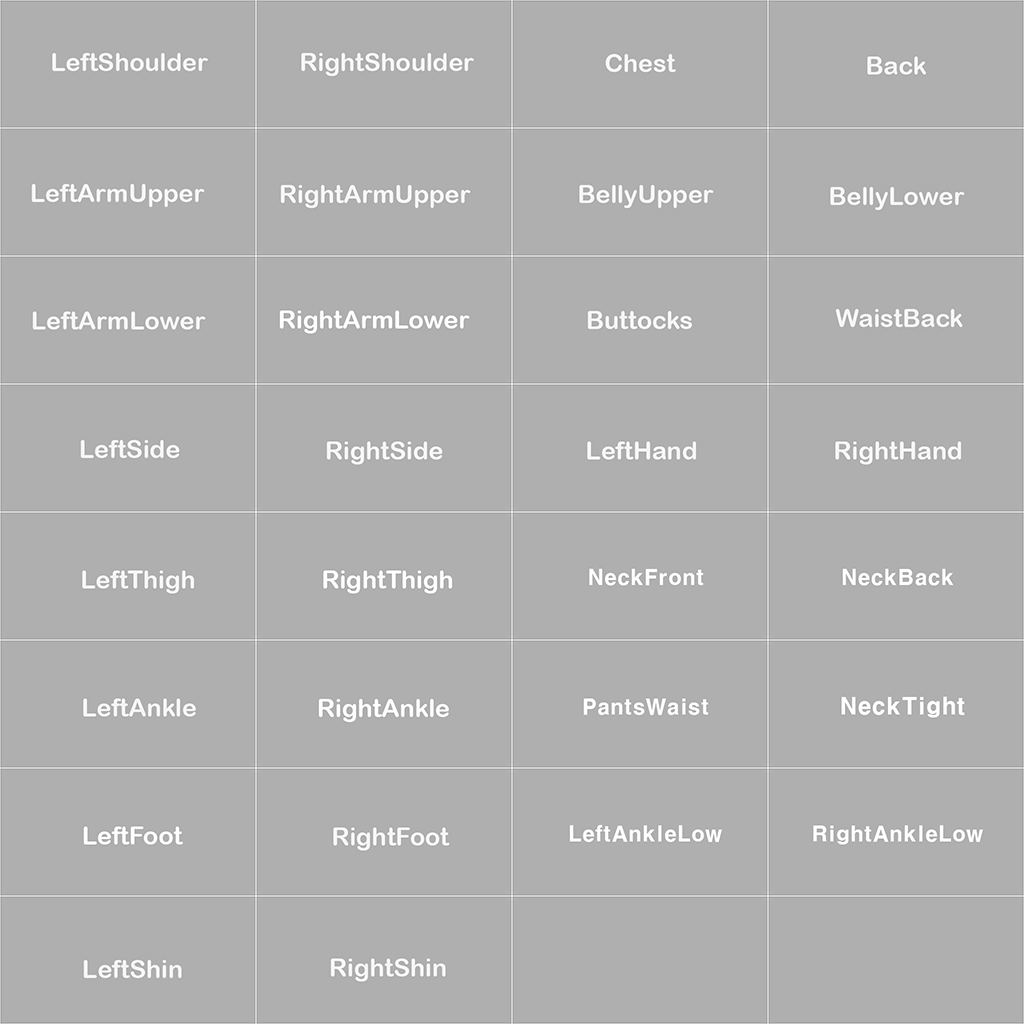
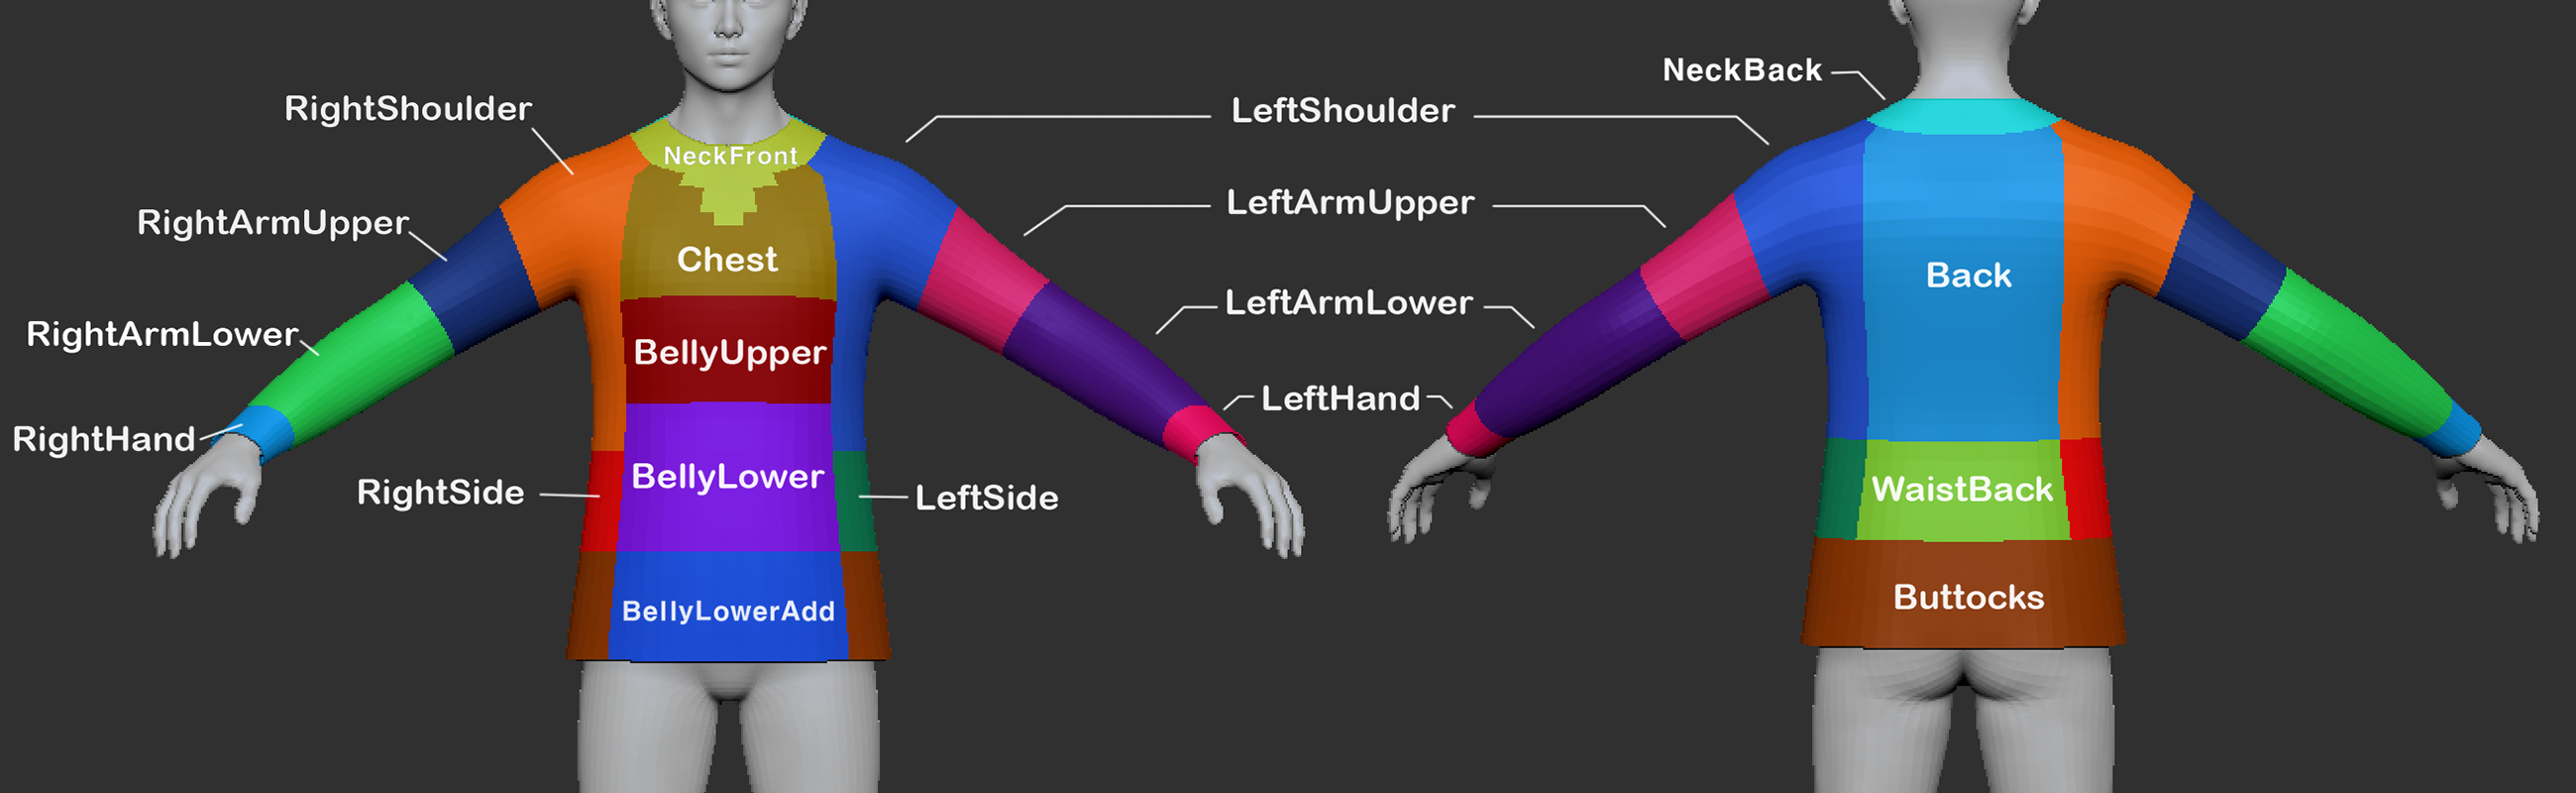
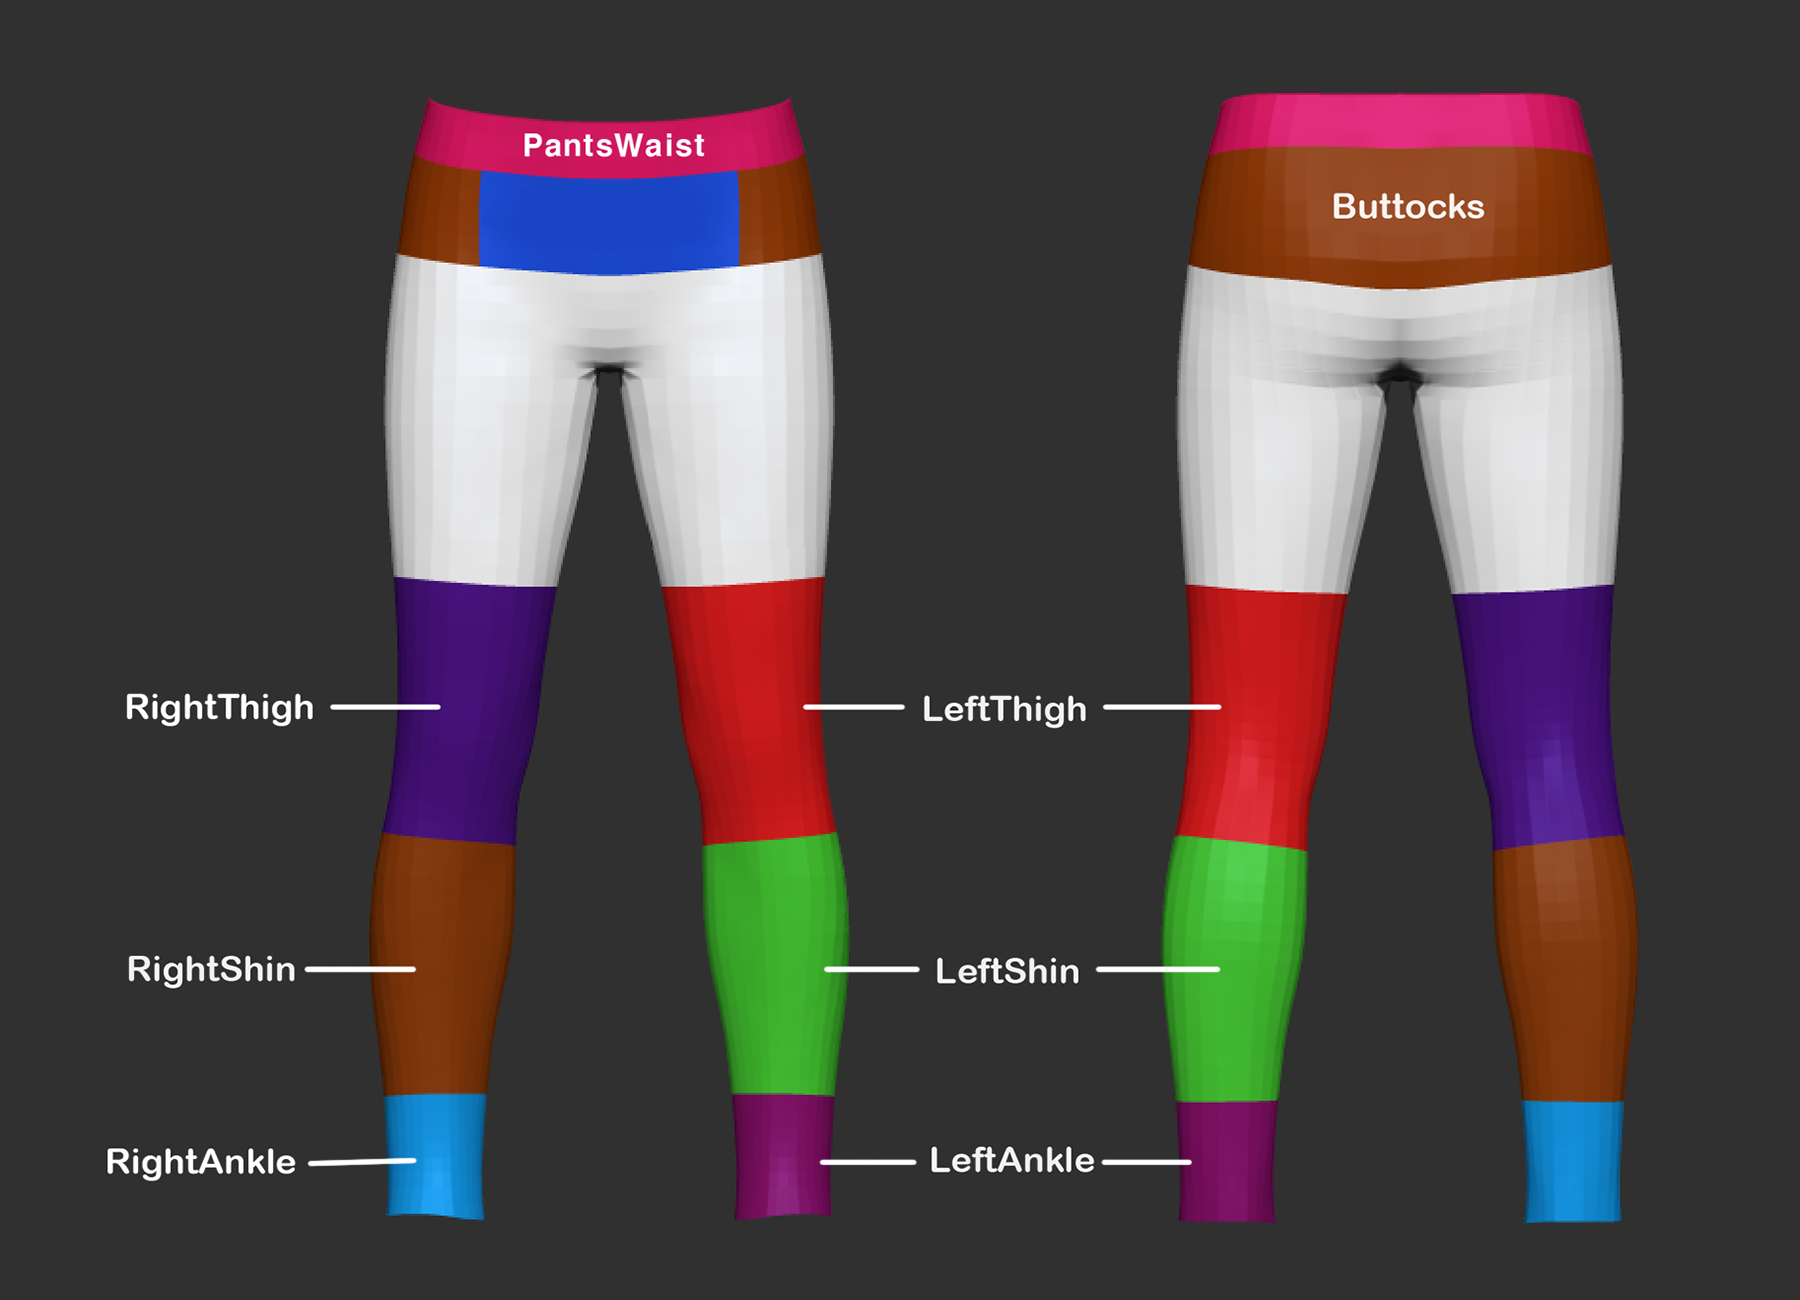
- Example Region IDs
| Region ID | Description |
|---|---|
| Chest | Chest area |
| BellyUpper | Upper abdomen |
| LeftArmUpper | Left upper arm |
- UV Channel 2 Region Guide
- Upper Layer Masking Region Guide
- Lower Layer Masking Region Guide
2. Covering Regions
- Description
- Use this when your outfit should hide another outfit in a lower layer.
- Example: If a long top covers the waist of pants, set
PantsWaistas a Covering Region. - The pants must also have
PantsWaistin their Drawing Regions, properly set in UV2.
- Covering Region Workflow
- Add individual or group IDs in the
"Covering Regions"field
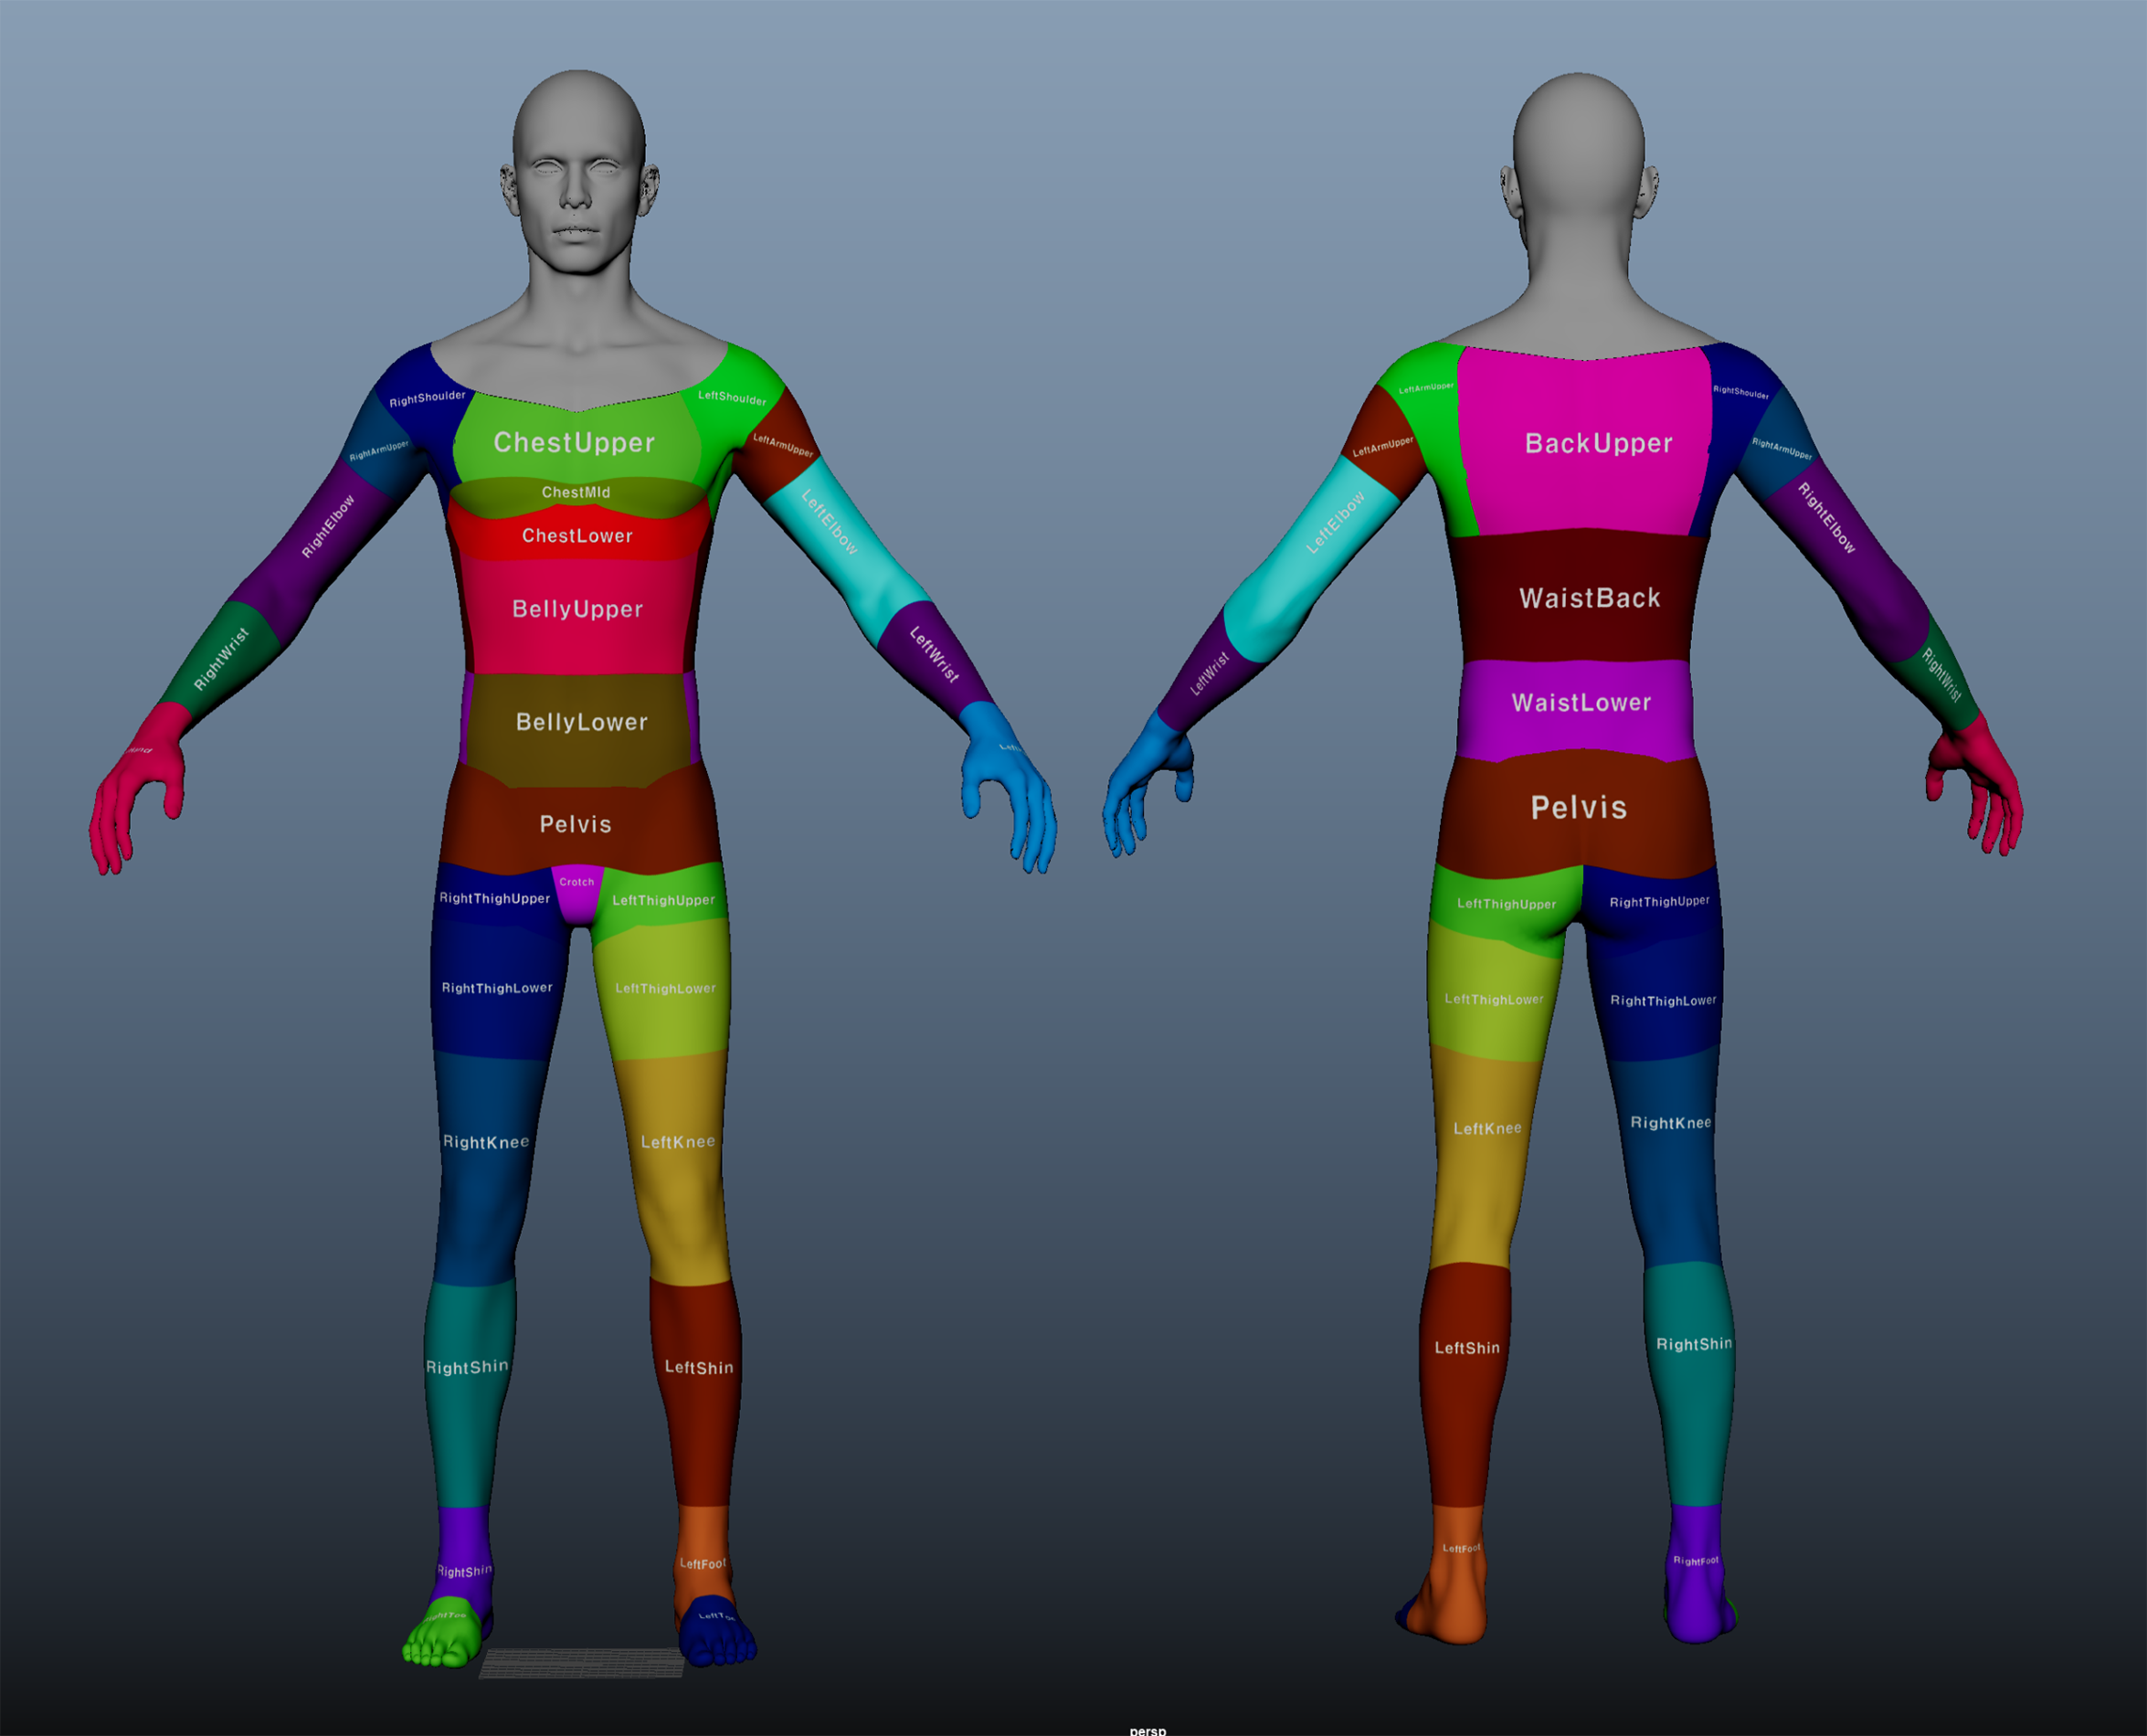
3. Body Regions
- Description
- Defines which parts of the character’s body mesh should be hidden when wearing the outfit.
- Used to prevent body parts from poking through shirts, pants, shoes, etc.
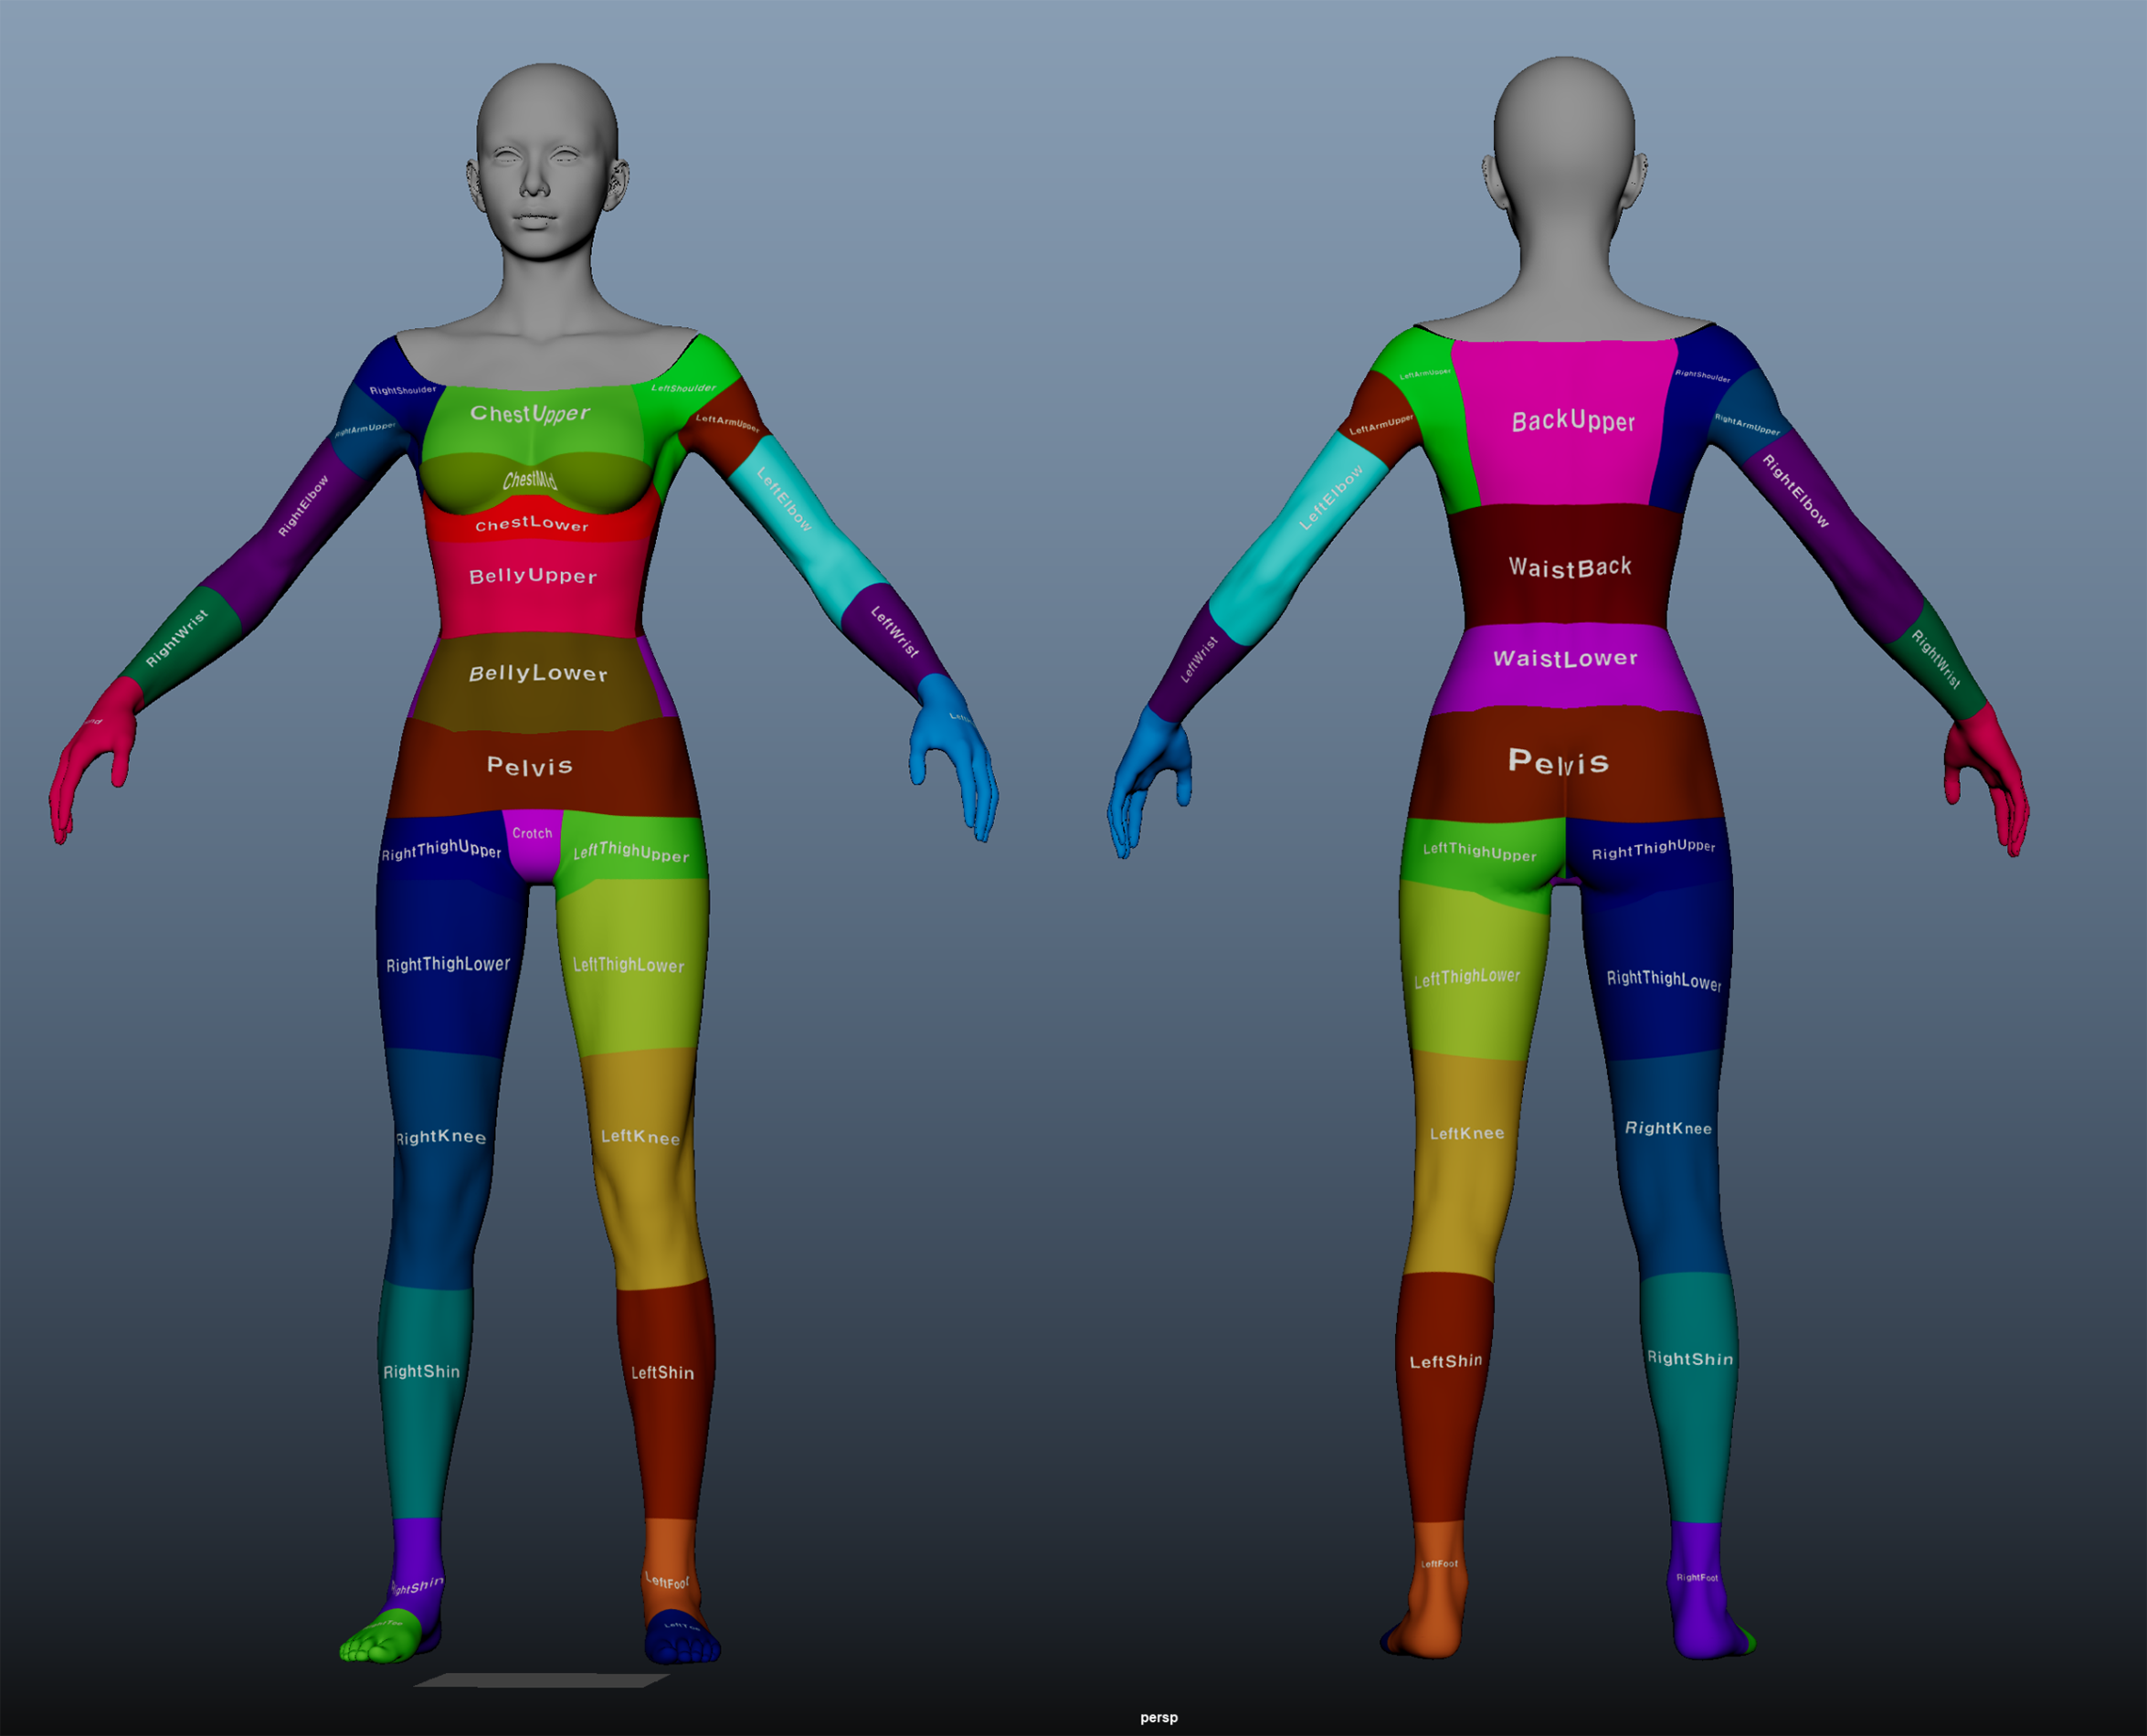
- Body Masking Region Guide
Full ID List (Summary)
| Drawing / Covering Regions (Clothing Parts) | Body Regions (Body Parts) |
|---|---|
| LeftShoulder, RightShoulder | ChestUpper, BackUpper |
| Chest, Back, BellyUpper | LeftArmUpper, LeftElbow |
| LeftArmUpper, RightArmUpper | BellyUpper, BellyLower |
| LeftThigh, RightThigh | WaistBack, Pelvis |
| LeftShin, RightShin | LeftShin, RightShin |
| LeftFoot, RightFoot | LeftFoot, RightFoot |
| etc. | etc. |
Group ID System
Group IDs allow bundling multiple Region IDs into a single convenient setting.
| Group ID Name | Example Included Regions |
|---|---|
| UpperBodyClosed | Chest, BellyUpper, Back, LeftArmUpper, RightArmUpper |
| BottomMid | BellyLower, Buttocks, LeftThigh, RightThigh |
| ArmsAll | LeftArmUpper, LeftArmLower, RightArmUpper, RightArmLower |
- Beginners can use Group IDs for faster setup
- Advanced users may add individual IDs for more control
Common Mistakes & Fixes
| Mistake | Cause | Solution |
|---|---|---|
| UV2 not set | UV Channel 2 not included | Make sure UV2 is exported |
| My outfit isn’t masked | - Incorrect UV2 setup - Missing Drawing Region ID - Missing matching Covering Region ID |
- Fix UV2 - Add Region IDs |
| Lower outfit not masked | - Missing Covering Region ID - No matching Drawing Region on lower outfit |
Fix Covering Region ID |
| Body pokes through outfit | Body Region not set | Add the correct Body Region ID |
**Chapter Summary
| Checklist | Done |
|---|---|
| UV Channel 2 created and placed | ✅ |
| Drawing Regions set | ✅ |
| Covering Regions set | ✅ |
| Body Regions set | ✅ |
| Group ID used if needed | ✅ |