Vehicle
01. What is a vehicle mod?
A vehicle mod changes one of the game's drivable vehicles - a car, motorcycle, bicycle or boat. You are not building a vehicle from nothing: you start from an existing one and replace the parts you care about.
Almost everything you touch is data, not assets. The vehicle keeps the shape the game shipped it with, and your mod ships a patch that says "for this vehicle, use this mesh, this colour, this seat position". That is why a reskin can be a few megabytes instead of a few hundred.
Mental model
The game owns the vehicle's structure. Your mod owns the values that structure reads.
02. Before you start
What you need
| Item | Notes |
|---|---|
| A base vehicle to start from | Every mod begins as an Override or Duplicate of a shipped vehicle. |
| FBX meshes | Only if you are replacing body parts. One FBX per mesh slot you want to change. |
| Textures | Base colour, normal and packed maps for any material you author. |
| A square icon | For the representative colour. This becomes the in-game thumbnail. |
What you do not need
- You do not need the game's vehicle art. ModKit does not ship it, and you never have to edit the original vehicle.
- You do not need to touch bounds or handling for an appearance mod.
03. Override or Duplicate
When you create the workspace you pick one of two modes, and the choice is hard to reverse later.
| Mode | What happens | Pick it when |
|---|---|---|
| Override | Your patch replaces the vanilla vehicle's data. Same Id, same showroom entry. Load the mod and that car changes. | You are reskinning a vehicle that already exists. |
| Duplicate | A new vehicle Id is created next to the original. Both appear in game. | You are adding a vehicle rather than replacing one. |
Duplicate also gives you room to change shared data safely. Several vehicles share one vehicle template - dimensions, crash weight, audio and part animation all live there - so editing it can affect its siblings. The workspace notices this and splits off a private template the first time you change something template-level.
⚠️ An Override mod still shares its template with other vehicles. If you change audio or part animation on one, isolate it first, or the change lands on its siblings too. See Bounds & Audio.
04. The workspace sections
The sidebar groups the vehicle into sections. Which ones appear depends on the vehicle: a boat has no seats of the kind a car has, so it has no Seats section.
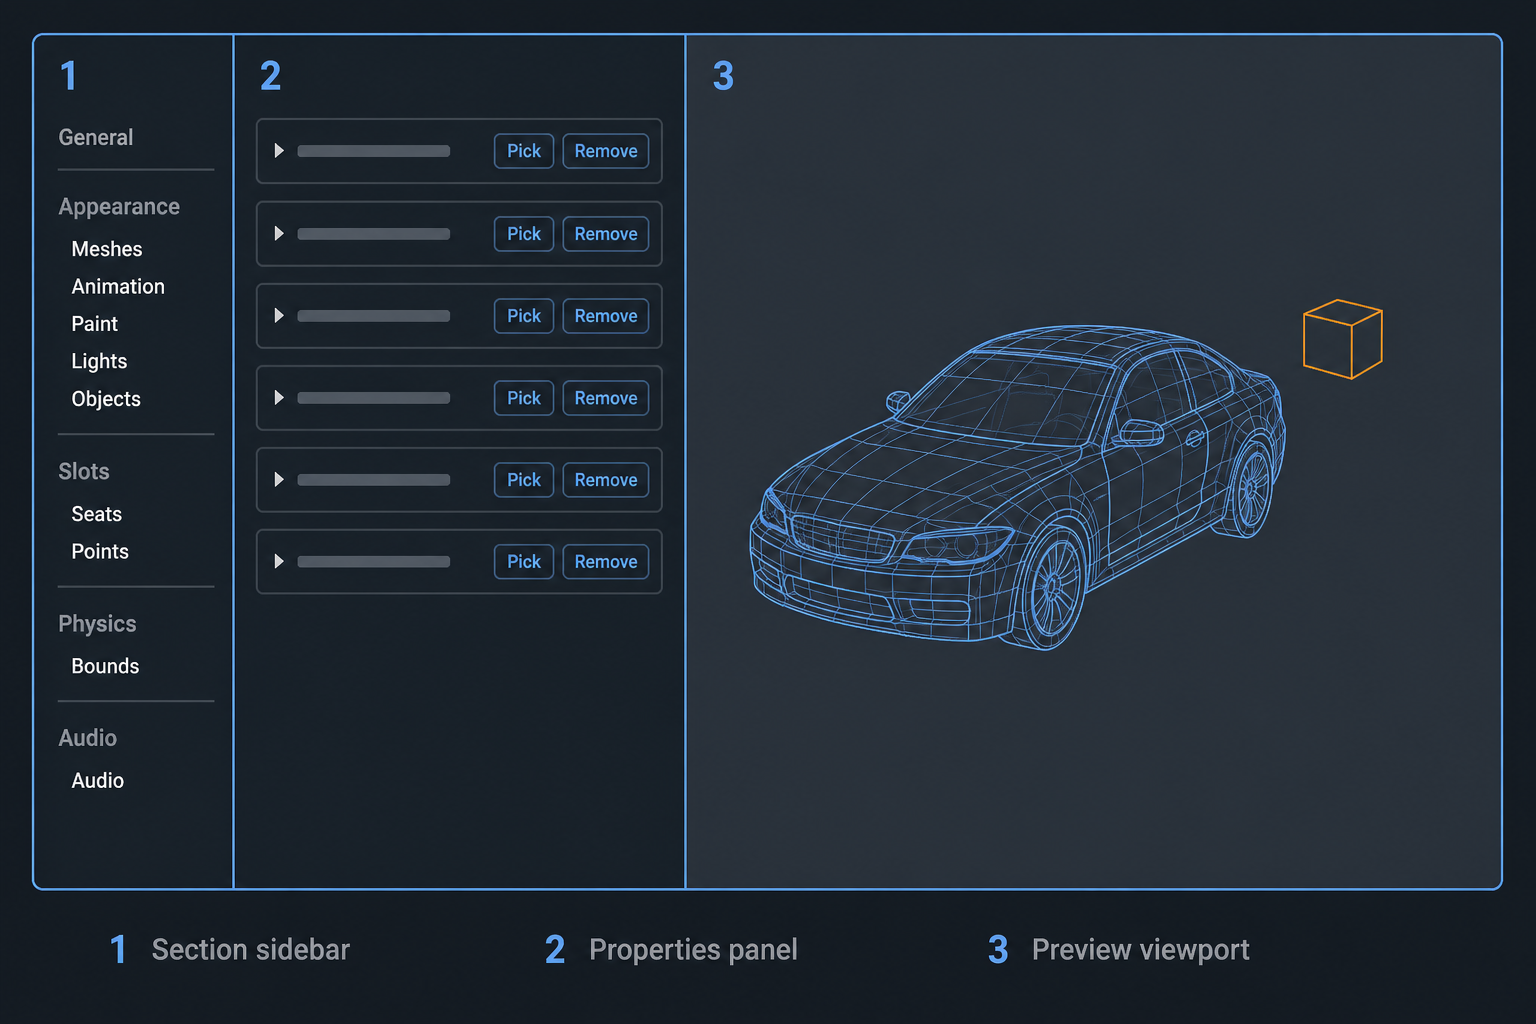
| # | Area | What it is for |
|---|---|---|
| 1 | Section sidebar | Jumps between the parts of the vehicle. Sections that do not apply are hidden. |
| 2 | Properties panel | The values for the selected section. Rows with a Pick button can be selected in the viewport and moved with the gizmo. |
| 3 | Preview viewport | The vehicle as ModKit can render it, plus placement markers for things it has no art for. |
| Group | Section | What lives there | Page |
|---|---|---|---|
| (none) | General | Name, price, purchase conditions, thumbnail, distant mesh. | General |
| Appearance | Meshes | Every mesh slot on the vehicle. Swap a body panel, a wheel, a mirror. | Appearance |
| Appearance | Materials | The material in each mesh slot, plus buttons to create CarPaint and Prop materials. | Appearance |
| Appearance | Animation | Two tabs: part motion as curves, and the passenger animation Ids for each seat. | Animation |
| Appearance | Paint | The colour variants a player can choose from. | Appearance |
| Appearance | Lights | Head lights, tail lights, indicators. | Appearance |
| Appearance | Objects | Objects the vehicle carries, plus boat disembark points. | Objects |
| Slots | Seats | Where a Zoi sits and the anchor they walk up to. | Slots |
| Slots | Points | Trunk, bonnet, wash and selfie spots, FX points, audio/UI pivots. | Slots |
| Physics | Bounds | The placement/collision box. | Bounds & Audio |
| Physics | Driving | Top speed, acceleration, braking, steering. | Driving parameters |
| Audio | Audio | Engine, spawn and despawn sounds. | Bounds & Audio |
| (none) | Components | Every component on the vehicle, as a tree. Pick one to inspect it, or several to edit the properties they share. Picking a component in the viewport selects it here too. | Slots |
| (none) | Tools | Workspace utilities. | - |
Saving. Edits made in the workspace stay unsaved until you press Save, next to the back arrow at the top right. That covers meshes, lights, seats, points and other parts, and also Audio and Animation, table values and existing assets the workspace changes, such as a texture set on a material. Until then the title row shows Unsaved changes; the undo arrow beside Save reverts all of them. Assets the workspace creates, such as a new material, are kept even when you revert. Leaving the workspace, closing ModKit Home or the editor, and packaging all ask you to save first. If ModKit closes unexpectedly, reopening the workspace offers to restore them. If the saved data is changed elsewhere (for example in the Data Editor) while you are editing, Save asks before replacing that change.
Panel size. Drag Scale at the top right to make the workspace panel larger or smaller. Every workspace uses the same size, and ModKit keeps it the next time you start.
05. Workflow at a glance
A typical reskin, in the order that avoids rework.
- Create the workspace. Pick the base vehicle, then Override (reskin) or Duplicate (new vehicle).
- Survey what you have. Open Meshes and note the slot names you intend to replace. Slots are grouped by body area.
- Import your meshes. Use the Import button on a slot's mesh field, or import first and pick the asset afterwards.
- Fit the meshes. Adjust each slot's transform if your mesh has a different origin or size from the original.
- Update Bounds. A mesh swap does not resize the vehicle. Do this whenever your body is noticeably bigger or smaller.
- Replace the distant mesh. Set the simplified mesh in General, or your vehicle reverts to the original silhouette at a distance.
- Paint and lights. Set the representative colour and its icon, then add colour variants and tune the lamps.
- Move what shifted. If the body changed shape, check seats, interaction points and carried objects.
- Animation, if you want it. Author door/trunk/wiper motion.
- Set the data. Price, purchase conditions, display name.
- Save, package, test in game.
Steps 5, 6 and 8 are the ones most often skipped, and they are the usual cause of "it looked right in ModKit but wrong in game".
06. What you cannot change
Worth knowing before you plan a mod.
| Limitation | Why | Workaround |
|---|---|---|
| Number of seats | A vehicle carries seven at most - a driver plus six passengers - and on a car the seats come with the vehicle rather than from data. | None on cars. Boats are a partial exception, see Objects. |
| Adding or removing mesh slots | Slots are part of the vehicle's structure. | Replace what a slot shows, or hide it by leaving it empty. |
| Handling with Advanced Driving Mode on | Cars and motorcycles switch to a physics path tuned once per vehicle type. | Your values apply with the option off. Bicycles and boats are never affected. |
| Adding lights | Light slots come with the vehicle. | Tune the existing ones. |
07. Driving parameters
A common question: where do I change how fast the vehicle goes?
Open the Driving section, under Physics in the sidebar. Speed, acceleration, braking and steering live there. They are not stored in any data table - they sit on the vehicle's movement component - but the workspace reads and writes them for you, and the values are applied when the vehicle spawns.
Which settings you see depends on the vehicle type, because a boat and a motorcycle do not move the same way. The panel works this out for you and shows only the ones that apply. Speeds and accelerations are in centimetres per second, so 1500 is roughly 54 km/h; angles are degrees and times are seconds.
Shared by every vehicle type
| Value | What it does |
|---|---|
MaxForwardVelocity | Top speed going forward. |
MaxReverseVelocity | Top speed in reverse. |
Acceleration | How quickly it picks up speed forward. |
ReverseAcceleration | Same, in reverse. |
BrakeDeceleration | How hard the brake slows it. |
NaturalDeceleration | Coasting slowdown with no input. |
SlideDecelertaion | Slowdown while sliding. |
MaxWheelAngle | Total steering lock. 120 means 60 each way. |
MaxWheelRotateTime | Seconds to steer from centre to full lock. |
MaxWheelReturnRotateTime | Seconds for steering to spring back to centre. |
SteeringSensitivity | Steering responsiveness multiplier. |
Motorcycle and bicycle only
| Value | What it does |
|---|---|
ReverseSteeringScale | Steering-angle multiplier while reversing. 1.0 matches forward. |
MaxLeanAngle | How far the bike leans into a corner. |
LeanSpeed | How quickly it leans over. |
Boat only
| Value | What it does |
|---|---|
MaxBankingAngle | How far the hull rolls into a turn. |
MaxPitchingAngle | How far the bow rises and falls. |
BankingSpeed | How quickly the hull rolls. |
There is no table of default values here, because there is no such thing as a
useful default: every vehicle in the game ships its own tuning and they differ
widely. A Casper steers at MaxWheelAngle 120 while a scooter uses 90, and that
scooter tops out at 850 where the car reaches 1500. Read what your vehicle
currently has in the panel and adjust from there, rather than from a number you
saw in a guide.
⚠️ Two limits to keep in mind while tuning.
- Cars and motorcycles ignore these values when the player turns Advanced Driving Mode on: the game switches to a physics path with one shared tuning per vehicle type. Bicycles and boats always use your values.
- The traffic that fills the city runs on a separate movement system and is never affected.
A few settings exist in the vehicle data but are never read by the game, so the Driving section hides them: the handbrake pair, the steering-deceleration pair, and the slide-angle offset. If you see them mentioned elsewhere, they have no effect in the current build.
08. Chapter summary
| Checklist | Done |
|---|---|
| Do I know whether I want Override or Duplicate? | ✅ |
| Do I have an FBX per slot I intend to replace? | ✅ |
| Do I have a square icon for the representative colour? | ✅ |
| Am I aware that Bounds and the distant mesh are manual steps? | ✅ |
09. Where to go next
- General - price, purchase conditions, thumbnail, distant mesh.
- Appearance - meshes, materials, paint and lights.
- Animation - door, trunk and wiper motion.
- Slots - seats, sit positions, interaction and FX points.
- Objects - carried objects, boat seating, disembark points.
- Bounds & Audio - the collision box, engine sound, packaging.
If you would rather drive the workspace from a script or an AI
assistant, every section here also has an MCP tool; start from
modkit_list_vehicle_components.
10. Data reference
The workspace writes into these tables for you. You do not need to edit them by hand, but the field descriptions are the quickest way to find out what a value actually means.
- Vehicle - the vehicle itself: name, price, colours, purchase settings.
- VehicleTemplate - the shared template: dimensions, seat count, part animation.
- ObjectBP - the component data: meshes, transforms, lights, slots.