Files
A UI is just four files in a folder. ModKit creates them for you the first time you add an app to your project.
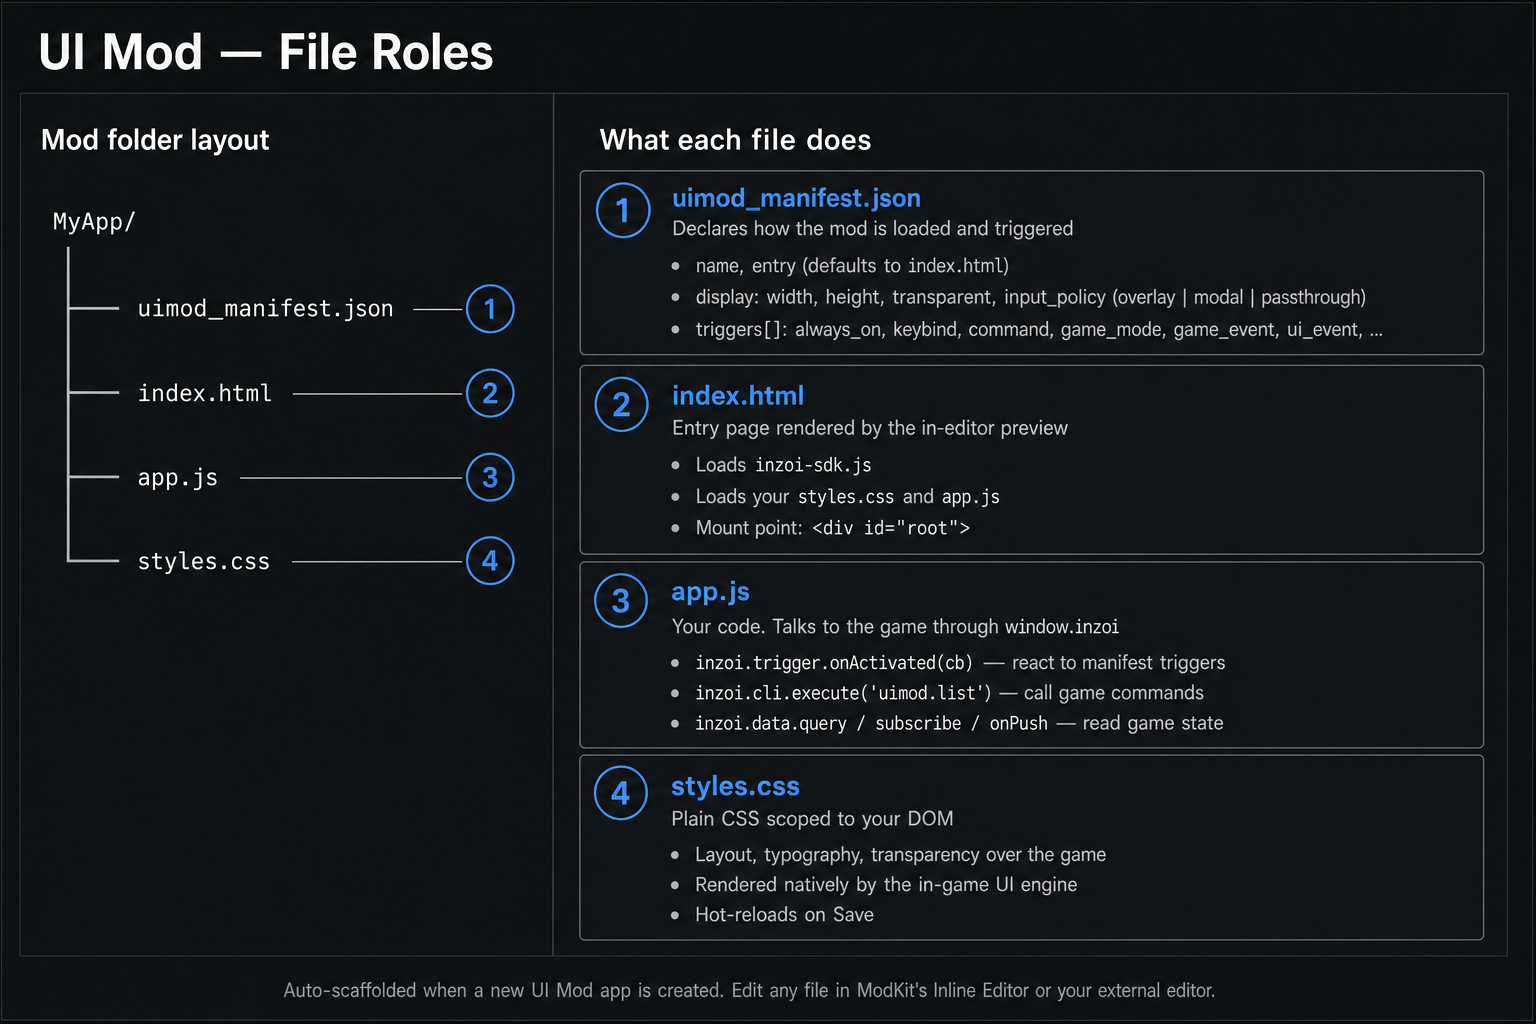
01. The four files at a glance
| File | One-line role |
|---|---|
uimod_manifest.json | The "settings card" — when does this UI open, how big is it, can it click through to the game? |
index.html | The HTML page the game renders. The visible structure of your panel. |
app.js | Your JavaScript. Reacts to triggers and talks to the game. |
styles.css | Plain CSS. Controls how your panel looks. |
Term: "app"
One mod can contain multiple UI apps (e.g. a
clock_widgetand amood_panel). Each app is its own folder with its own four files. Picking which app is active is what the File Tree in the workspace does.
02. uimod_manifest.json — the settings card
This is the only file the game requires in order to load your panel.
It is tiny. Here is the manifest from the shipped Clock Widget sample:
{
    "name": "Clock Widget",
    "entry": "index.html",
    "display": {
        "width": 1920,
        "height": 1080,
        "transparent": true,
        "input_policy": "passthrough"
    },
    "triggers": [
        { "type": "always_on" }
    ]
}
And here is Mood Panel, which is opened on a keybind and also
through a chat command:
{
    "name": "Mood Panel",
    "entry": "index.html",
    "display": {
        "width": 1920,
        "height": 1080,
        "transparent": true,
        "input_policy": "overlay"
    },
    "triggers": [
        { "type": "keybind", "key": "M", "modifiers": ["Ctrl"] },
        { "type": "command", "command": "mood_panel.toggle" }
    ]
}
02-1. Top-level fields
| Field | Meaning | Default |
|---|---|---|
name | Human-readable name of the app. Shown in lists. | required |
entry | The HTML file the game opens first. | "index.html" |
display | How the panel is sized and how it handles input. | see below |
triggers | When your panel wakes up. At least one entry. | required |
02-2. display
| Sub-field | What it does |
|---|---|
width, height | The logical size of your panel in pixels. Internally always treated as a 1920x1080 canvas — scale your CSS accordingly. |
transparent | true lets the game show through anywhere you don't draw. |
input_policy | How your panel handles mouse/keyboard. See the term box below. |
Term:
input_policy
overlay— I want clicks on me, but the game keeps running. Best default for panels with buttons, drag handles, sliders, or scroll areas (e.g.Mood Panel).modal— I want clicks on me, and the game should pause behind me. For full-screen dialogs.passthrough— I never want clicks. Anything the user clicks should hit the game. For passive HUDs and decoration likeClock Widget. Do not use this for interactive panels.
02-3. triggers
A trigger is the condition that opens your panel. Each entry is
{ "type": "...", ...extra fields... }.
type | Extra field(s) | When it fires |
|---|---|---|
always_on | — | The panel is always visible. Best with passthrough. |
keybind | key (a single key, e.g. "F1", "M") and optional modifiers (e.g. ["Ctrl"]) | Player presses the key with exactly those modifiers held. |
command | command (e.g. "mood_panel.toggle") | Player types the chat/cheat command. |
game_mode | mode (string or array of mode names) | The game enters one of the listed modes. |
interaction_menu | label_key | A matching interaction is selected. |
game_event | event (e.g. "zoi.mood_changed") | The game emits the named event. |
ui_event | event | Another UI emits the named UI event. |
ui_injection | advanced runtime fields | The game asks for UI to be injected at a known spot. Use only when the target slot contract is known. |
manual / auto | — | Reserved for tooling. Use the explicit types above first. |
When you edit the manifest through ModKit's manifest panel or
modkit_write_uimod_manifest, trigger id values are generated on
save if you leave them blank. If you write uimod_manifest.json
directly as a raw file, every trigger must include a unique id;
the game-side parser rejects triggers without one.
Important:
game_modeusesmode, notmodes.The game-side manifest parser reads only the field named
mode. Use either a single string:or an array:
Do not write
"modes": []. The game ignores that field, so the trigger will never match and the UI will stay hidden. The"gameplay"alias expands to the common in-world modes:TopView,ShoulderView, andVehicle.
Use these values for game_mode:
| Value | Meaning |
|---|---|
gameplay | Recommended default alias. Expands to TopView, ShoulderView, and Vehicle. |
TopView | Zoi control in top-view mode. |
ShoulderView | Zoi control in shoulder-view mode. |
Vehicle | Vehicle control. |
Photo | Photo mode. |
FreeCamera | Free camera mode. |
Build | Build Studio. |
CharacterCustomize | Character Studio. |
Map | City/map mode. |
None | Common/lobby/no active gameplay mode. |
Trigger Recipes
Use always_on for HUDs that should exist immediately:
{ "type": "always_on" }
Use keybind when the player should press a key to open or toggle the
panel:
{ "type": "keybind", "key": "F1" }
For a key combination, put the key in key and the held modifiers in
modifiers:
{ "type": "keybind", "key": "M", "modifiers": ["Ctrl"] }
Important:
"key": "Ctrl+M"does not work.The game-side parser looks
keyup as one key name and does not split"+", so"Ctrl+M"resolves to an invalid key and the trigger never fires — silently, with no in-game error. Write the key and the modifiers separately.
modifiersmust be an array of strings, and only"Ctrl","Shift"and"Alt"are recognised — spelled exactly like that, since the game matches them case-sensitively. Matching is exact: with"modifiers": ["Ctrl"]the trigger fires on Ctrl+M but not on Ctrl+Shift+M, and akeybindwith nomodifiersdoes not fire while Ctrl, Shift or Alt is held.
Use command when the player or another tool should open it by command:
{ "type": "command", "command": "mood_panel.toggle" }
Use game_event / ui_event only when you know the event name emitted
by the game or another UI:
{ "type": "game_event", "event": "zoi.mood_changed" }
Use interaction_menu for advanced menu injection. The label field is
label_key, not label:
{ "type": "interaction_menu", "target": "character", "label_key": "My Action" }
Your JavaScript receives the trigger through one callback:
inzoi.trigger.onActivated(function (t) {
    if (t.type === "keybind" && t.key === "F1") {
        // Open, close, or run your UI action here.
    }
});
You can declare multiple triggers in the same manifest. Mood Panel
uses both keybind and command so the player can choose how to open
it.
03. index.html — the page
A UI's index.html is a regular HTML page. The only conventions:
- It should load the SDK so
window.inzoi.*is available in your scripts. - It usually ends with
<script src="app.js"></script>so your code runs after the DOM is ready.
Minimal example (this is exactly what ModKit scaffolds):
<!DOCTYPE html>
<html>
<head>
    <meta charset="utf-8">
    <title>My App</title>
    <link rel="stylesheet" href="styles.css">
    <script src="coui://inzoi/cohtml.js"></script>
    <script src="coui://inzoi/mod/inzoi-sdk.js"></script>
</head>
<body>
    <div id="root">Hello, inZOI</div>
    <script src="app.js"></script>
</body>
</html>
Why these two
coui://scripts?
coui://is the in-game UI engine's equivalent ofhttps://. Both files live next to the game — you do not bundle them, you just reference them.
cohtml.jsboots the engine binding (engineglobal, view lifecycle callbacks). Required: without it the view stays inLoadingstate and never receives input.inzoi-sdk.jsexposes the high-levelwindow.inzoiAPI (inzoi.cli,inzoi.trigger,inzoi.view, …) on top ofengine.Always load them in this order, before your own scripts. In the editor preview, ModKit injects equivalent mocks so your code behaves identically.
04. app.js — your code
app.js is where you actually do things. The pattern in every
shipped sample is the same:
- Get references to your DOM elements.
- Wire up DOM events (button clicks, mouseenter, etc.).
- Subscribe to UI triggers with
inzoi.trigger.onActivated. - Call game commands with
inzoi.cli.execute.
You will see this pattern in detail on the Scripting page.
05. styles.css — appearance
This is plain CSS. The in-game UI engine renders it natively, so all the usual properties work — flexbox, transitions, custom properties, etc.
Two things to keep in mind:
- The canvas is treated as 1920x1080. If you want pixel-perfect results, design your CSS against that size.
- If
display.transparentistrue, the body background should also be transparent (background: transparent;or just no background) so the game shows through.
06. Multiple apps in one mod
If your mod ships more than one app, ModKit also creates a small
uimod_apps.json at the ui/ root that lists them:
{
    "apps": [
        { "name": "clock_widget", "default": true,  "enabled": true },
        { "name": "mood_panel",   "default": false, "enabled": true }
    ]
}
You almost never edit this by hand. ModKit updates it when you add or remove apps from the workspace.