Asset Editor
Checking the Generated Files
When you create a mod project, the ModKit generates the actual asset files for that mod inside the Unreal Engine's Plugins folder. You can see the generated file structure at the path Content > Plugins > [Mod Name] Content through the Content Browser as shown below.
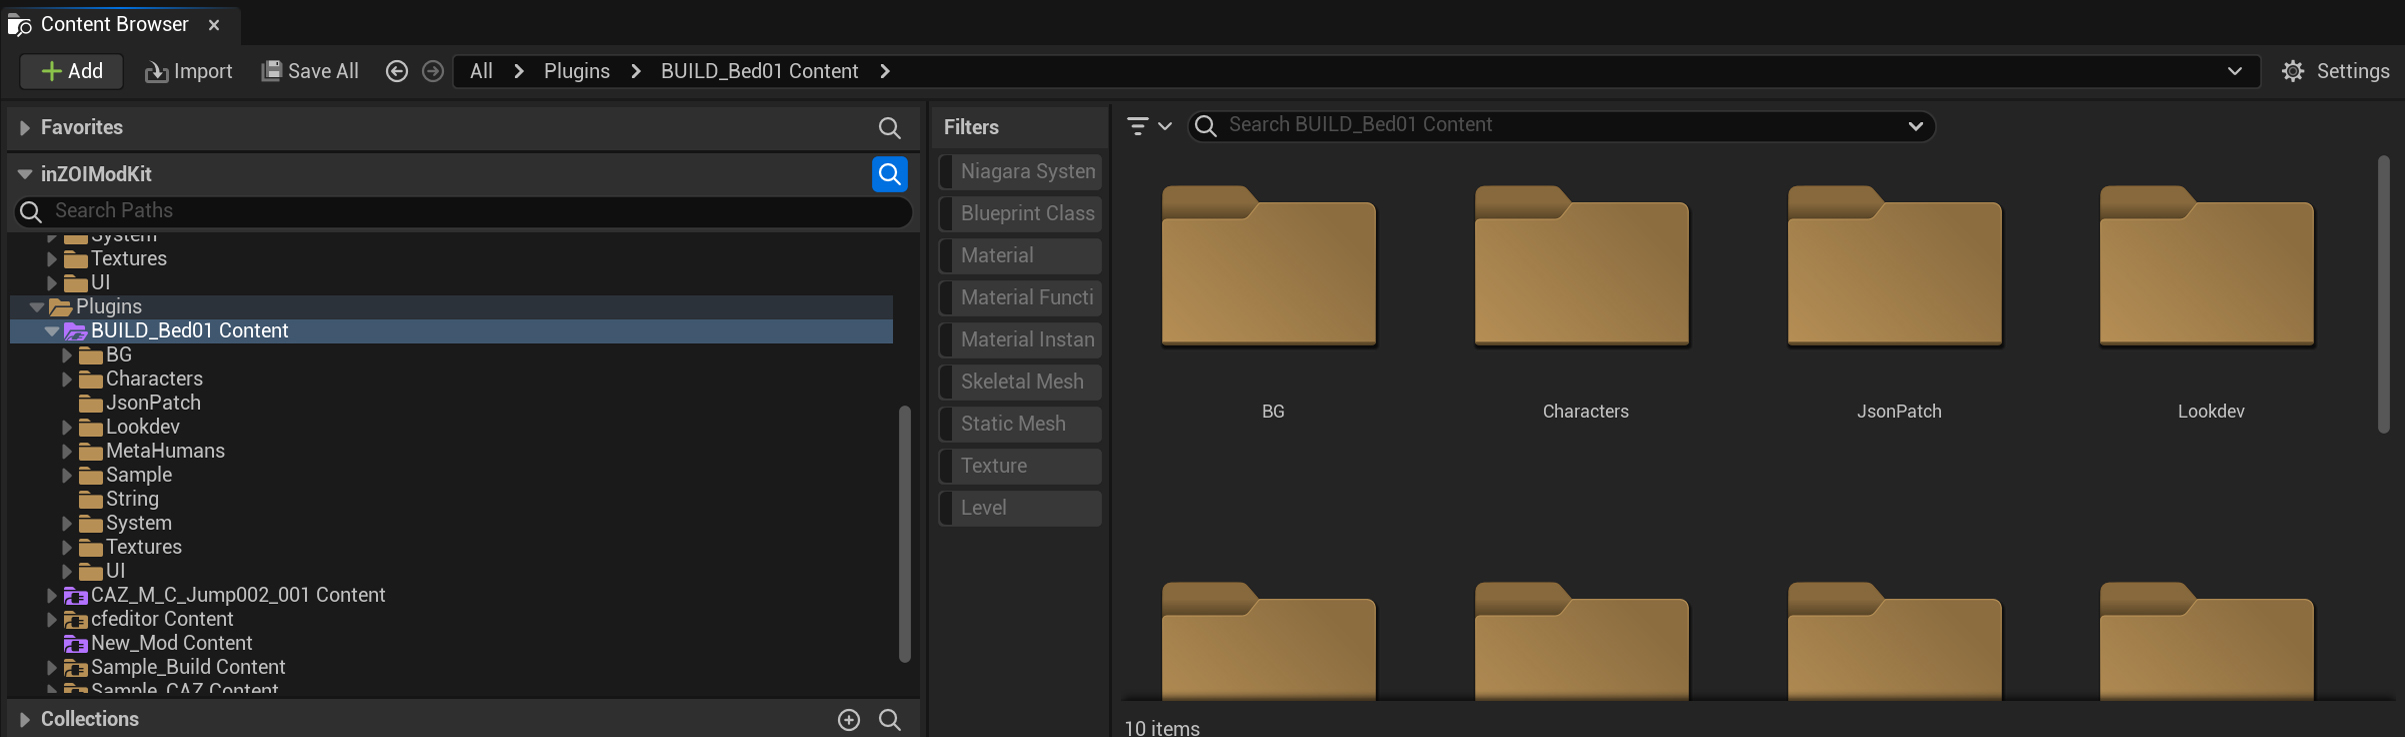
- When you create a mod, ModKit automatically creates several folders. Each folder has the role of storing a specific type of data, so it is important to organize files in the correct location.
- Compatibility issues with existing mods can be resolved by referring to the Fix Up guide below.
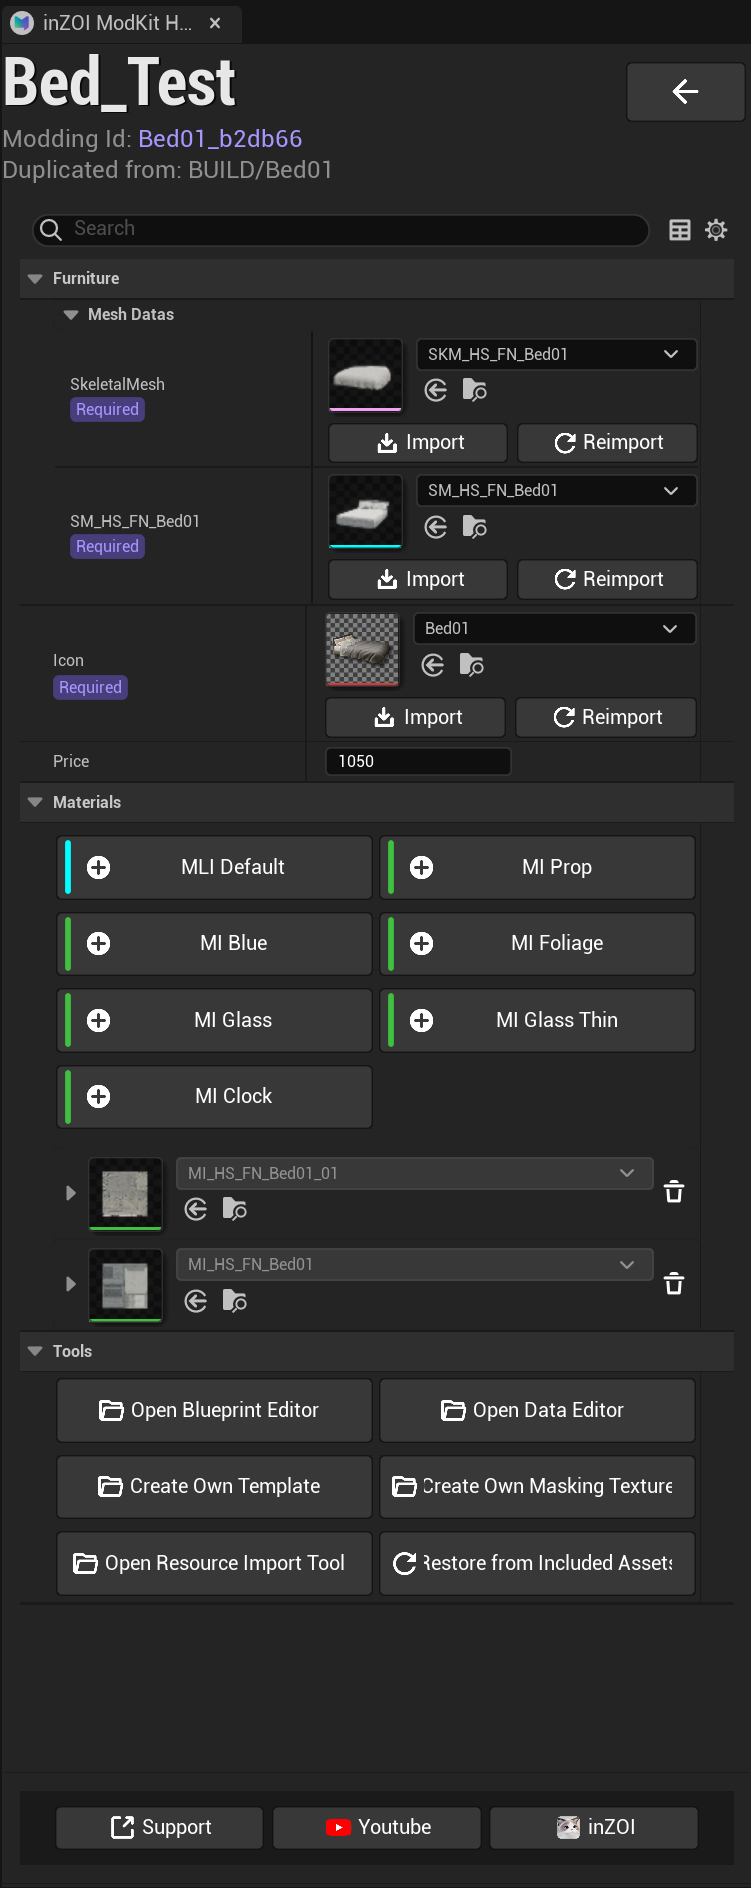
This is the main editor screen that appears when you open a specific project from 'MY MOD PROJECTS'. Here, you can manage 3D assets (meshes, materials) for object mods like furniture and props, and configure various properties that determine their in-game behavior.
Furniture
Every property of the object lives in the Furniture panel. The sidebar on the left splits it into eleven sections.
| Group | Sections |
|---|---|
| — | General |
| Appearance | Mesh, Material, Customize, Light, Bounds |
| Interaction | Slot, Deco, Behavior |
| — | Components, Tools |
Deco appears only for window furniture. Customize has content only when the object's Customize Type is MaterialOnly. Stairs, fences and pillars build their parts in code, so their structure cannot be changed here.
Stairs, pillars, doors and windows have a few values of their own — step rise, landing depth, tiling, the window mask mesh. They are in General, under Object Variables, and are saved into the mod like any other field. A fence has none; its look comes entirely from the meshes on its components.
Edits made in the workspace stay unsaved until you press Save, next to the back arrow at the top right.
That covers mesh, component, light, slot and other object edits, and also table values, data assets and existing assets the workspace changes, such as a texture set on a material.
Until then the title row shows Unsaved changes, and the undo arrow beside Save reverts all of them. Leaving the workspace, closing ModKit Home or the editor, and packaging all ask you to save first.
Assets the workspace creates, such as a new material, are kept even when you revert.
If ModKit closes unexpectedly, reopening the workspace offers to restore the unsaved edits.
If the saved data is changed elsewhere while you are editing, for example in the Data Editor, Save asks before replacing that change.
Drag Scale at the top right to make the workspace panel larger or smaller. Every workspace uses the same size, and ModKit keeps it the next time you start.
General
Catalog information — how the object is listed, priced and filtered in build mode.
- Icon / Right Upper Icon: Images shown in the build mode catalog.
- Price: Purchase price in the build catalog.
- Object Category / Filter Category: Where the object appears in the catalog and which sub-filter it belongs to.
- Object Filter Tags / Object Tags: Tags the game uses for filtering and for gameplay rules.
- Weight: Carry weight.
- Is Unlockable / Market Price Id: Unlock and market pricing behaviour.
- Tax Id: Tax type applied when the object is bought or sold.
Below those, Object Variables holds the values the object itself carries rather than its data table row. What appears depends on the object: Is Camera Collision on everything, plus step rise and landing depth on stairs, tiling on pillars, the door template id, the window mask mesh. Generate Sub Material sits here too, next to the Is Camera Collision it depends on.
Mesh
The object's 3D parts. Each mesh component gets its own group with the mesh asset and its transform.
- Add Component: Adds a Static Mesh or Skeletal Mesh part.
- [Import] / [Reimport]: Brings an FBX in and applies it to that slot. Imported static meshes get Nanite and a box collision automatically.
- For FBX files with more than 200,000 vertices, ModKit shows the file and mesh statistics before import and asks whether to continue. The triangle count is an estimate from the FBX polygon data.
- Static Mesh: A fixed part that does not move, such as a bed frame.
- Skeletal Mesh: A part that deforms or animates when a Zoi interacts with it, such as a blanket on a bed.
Material
Defines the surface of the mesh — colour, texture and pattern.
- Create buttons at the top add a new material instance of the chosen type:
MI Blue(the layered master most objects use),MI Prop,MLI Default,MI Glass,MI Glass Thin,MI Foliage,MI Clock. Hover a button to see which master material and textures it needs. - Open Folder: Shows the mod's
Materialsfolder in the Content Browser, or the plugin root if no material has been created yet. - Mesh list: Every mesh part that has a mesh, with the material in each of its slots, in slot order. Parts without a mesh are left out. A slot marked Override uses its own material instead of the mesh's, so changing the material inside the mesh asset does not show there. Pick another material to override a slot, click the reset arrow to go back to the mesh's material, or click the edit icon to open the material in its editor. When the material belongs to your mod, Textures under the slot lets you import or reimport its textures.
Customize
Lets players restyle the object in game. Each part is one recolourable area.
- Pick the mesh, material slot and material layer the part covers from the dropdowns — the slot and layer names are shown next to the index.
- Parts Name is the label players see. Typing here registers the text in your mod's string table.
Only available when Customize Type is MaterialOnly, because that is the only case where the game reads the parts list.
Light
Light parts on the object.
- Add Component: Adds a Point Light or Spot Light.
- Each light exposes Intensity, Light Color, Attenuation Radius, Cast Shadows and its transform.
Bounds
How much space the object occupies in build mode, and how the camera treats it.
- Area Box: The footprint build mode reserves.
- Leave Use Mesh Bounds For Area Box on to derive the footprint from the mesh. Use Ignore Component Names to exclude parts from that calculation.
- Turn it off to enter an explicit Area Box Size in grid cells, and use Is Ceil for ceiling-mounted objects.
- Use Mesh Collision Box derives the box from collision instead of render bounds.
- Entrance Transform / Exit Transform: Where a Zoi enters and leaves the object.
- Show Bounds Box: Draws the box on the preview so you can check it visually.
Slot
Attachment points. Slots are what make one object snap onto another — plates on a table, a TV on a TV stand.
- Add Component: Adds a Slot or a Look At target.
- Each slot has a Slot Type, the object categories it accepts, and its transform relative to whatever it is attached to.
An object can only be placed into a slot if its Object Category is one the target slot accepts.
Deco
Window-only. Marks where window decoration such as curtains may not be placed.
- Add Component: Adds the Deco Area Root first, then Blocked Box children under it.
- The game finds the root by its tag, so add the root through this section rather than building it by hand.
Behavior
Rows in other data tables that this object points at — placement rules, interactions, sounds and carry behaviour.
Each Id field gives you three controls:
- A dropdown listing the rows you can choose from. The value currently in use is always in the list.
- Clone: Copies the referenced row into a row only this object uses, then points the field at your copy. Use this before changing anything, because the original row is shared with every other object that references it.
- Open Data Editor: Opens that table at that row.
The contents of a referenced row are edited in the Data Editor, not here.
Components
Every component on the object in one tree, with the object itself at the top.
- Select a row to highlight that component in the viewport and get its gizmo. Its values appear below the tree.
- Drag a row onto another to make it a child. Drop it on the object row to move it back to the top level.
- Right-click a row to rename, duplicate or delete it. A component with children must have its children removed first.
- Add Component: Every component type this workspace can create.
- Rows drawn in grey are created by the engine and cannot be renamed, moved or deleted. You can still select them to see where they sit.
Move a component with the gizmo or type its transform here — both are saved to the object's data.
Tools
-
Open Data Editor: Opens the data editor for this object's rows.
-
Open Resource Import Tool: Opens the drag-and-drop tool for meshes and textures.
-
Restore from Included Assets: Restores modified content back to the state it was in when the workspace was created. Appears only when the workspace was created with included assets.